Setup and Design Captive Portal Login Page on the TP-Link router with customizing your company logo. Easy step to enable captive portal authentication in TP-Link load balance router with multi-authentication mode.
How to Design Captive Portal Login Page on TP-Link Load Balance Router
TP-Link Load balancer router is a multi-wan failover router for reducing internet downtime for office. TPLink Load balancer not only balances the internet and failover but it loaded with many important features which compulsory to make secured network access. To make secured WiFi access for guest user captive portal authentication page required. also, check some best free hotspot authentication captive portal for your make secured Internet access.
Once you made load balance router with an active internet connection now enable the captive portal login page. TP-Link load balance router support customization of captive portal login page with your own design. If you are using load balance router in the hotel, office coffee shop, college campus and any other location where wifi user dynamically changes every day. These type of location required authentication captive portal page to protect your network and restrict UN-authorize access of internet.
With Captive portal option, you can manage the user and control the internet access time as per requirement. Captive portal authentication configuration simple in TP-link load balance and other routers In this post you will get step by step easy setup and design captive portal login page in TP-link.
TP-Link Load Balance Router Captive Portal Page Design
This post fully supports captive portal design and setup for TP-Link TL-R480t+, TP-Link TL-ER6120 and TL-ER5120 load balance router. If you are having any other model in TP-Link load balancer router you can setup captive portal using this manual.
To Setup captive portal login page in load balance router required admin access to the router web interface.
Connect and access the Load balance router in the browser to use customized captive portal for your internet access.
Login your Load balance router and follow the steps to design hotspot captive portal login page.
Go to Authentication—Authentication Settings
Web Authentication-
1: Settings- Enable Captive portal.
Idle Timeout– 30 (default) This is the time when user will out logout if no activity for a certain time. If you want to keep online always than set 0.
Portal Authentication Port: (8080, 1024-65535) set the port number for your authentication portal page redirection.
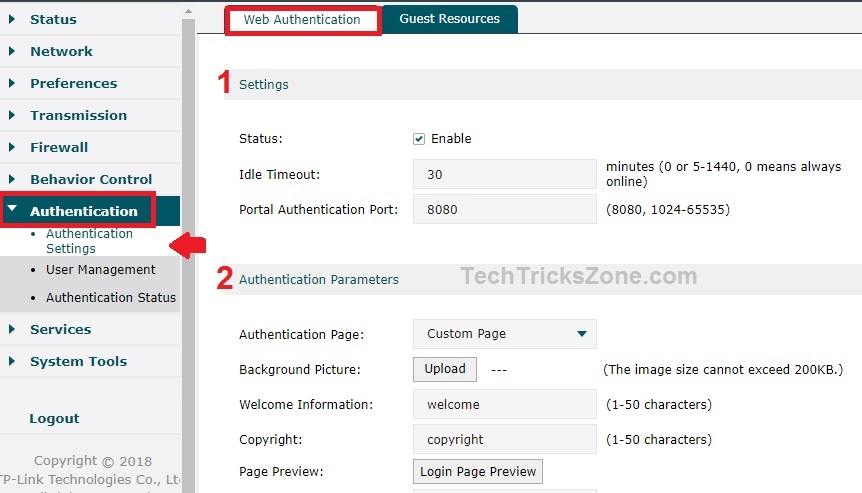
2: Authentication Parameters– This setting contains captive portal customization parameters.
To design your captive page locally select the Authentication page to custom page.
If you want to use any external link to redirect login page of the third-party captive portal such as Facebook page authentication select the External Links option. using the external link you can use social media authentication captive portal login to promote your business with the wifi access login page.
To design the captive login page follow steps.
Authentication page: Custom Page.
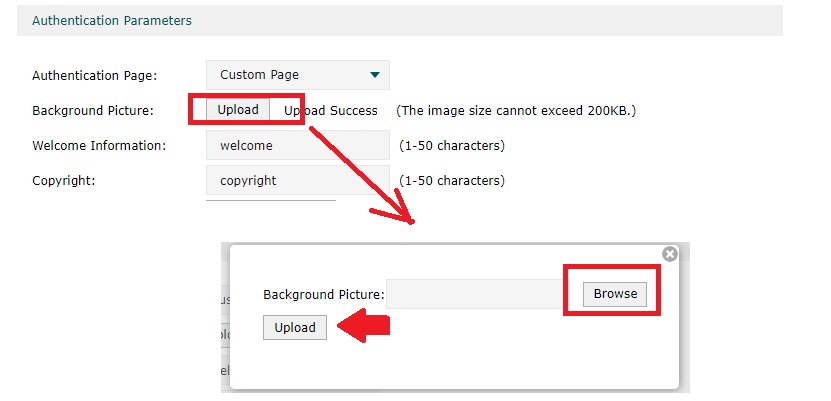
Background Picture– You can change the background picture of the hotspot login page with your company or business logo pictures.
Click the Upload button and browse the picture you want to set in captive portal background pictures.
Welcome Information: Type any message you want to give your WiFi users while access captive portal login page.
Copyright: Type here your business and company copyrights information.
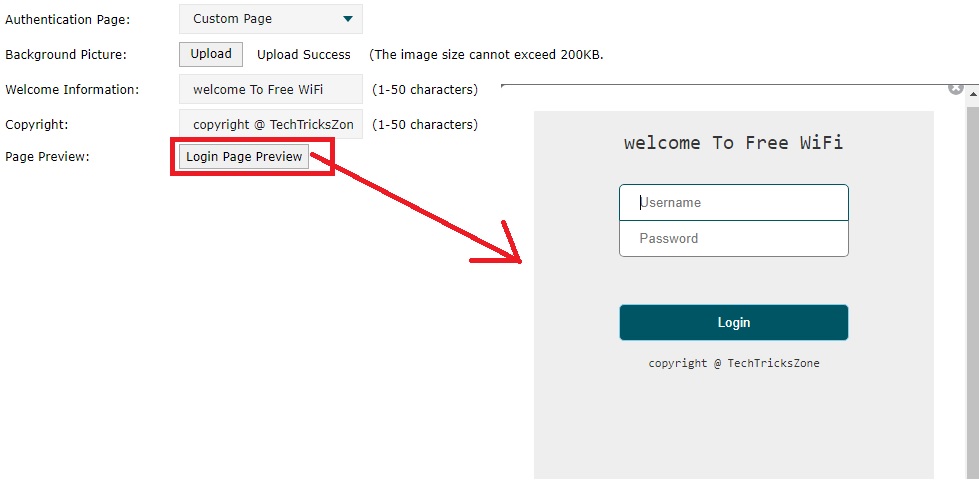
Login Page Preview- Click the button to see the preview of your new customize hotspot login page.
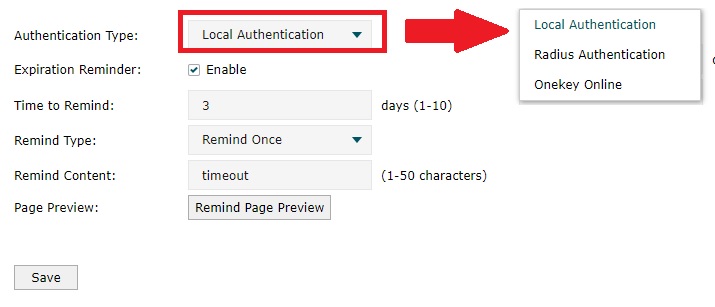
Authentication Type: TP-Link load balance router support multi-authentication method.
- Local Authentication
- Radius Authentication
- One Key Online
1: Configure Local Authentication Method in Captive Portal
Select Authentication Type: Location Authentication as shown below image.
Expiration Reminder: Enable (this option will remind the expiration)
Time to Remind: set the days to remind time.
Remind Type: Choose to remind once or remind periodically.
Remind Content: type the content you want to show for the reminder. ( EXP-timeout or page expired)
Click the Save button to finish the setup of the local authentication method for captive login page in TP-link router.
2: Captive portal Login with Radius Authentication
If you do not want to use TP-link local captive portal hotspot for WiFi user authentication than choose the radius authentication. You need radius server settings to configure radius authentication in your TP-Link load balancer router.
Authentication Type: Radius Authentication
Primary Radius Server: give the Radius Server IP Address
Secondary Server: set the optional server IP Address if you have anyone.
Authentication Port: set port of your radius server.
Authorized Share Key: set radius-server key to authentication with radius server.
Retry Time: set the time for retry.
Timeout interval time: Set interval time.
Authentication method: PAP or CHAP (choose the method used by your radius server).
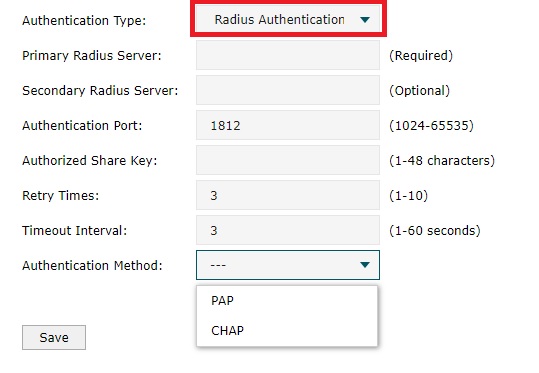
Click the Save button to apply settings.
3: Onekey Online
If you want to provide free WiFi for 30 minutes or more so you can use the Onekey Online authentication type. This option will give free wifi access to every user as per the set time limit of free wifi.
Authentication Type: Onekey Online.
Free Authentication Type: 30 (set the time duration of free WiFi internet access in minutes) you can provide 1 minute to 1440 minutes maximum free internet access. Once time limit crosses the internet will stop working.
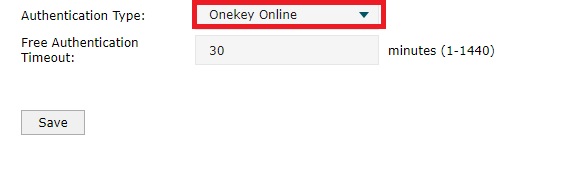
Press the Save button to apply.
Add and Manage WiFi Hotspot user in TP-Link Load Balance Router
After configuring captive portal Wi-Fi authentication required the add hotspot users. The second step is to create hotspot user to access wifi internet after authenticating login page.
To add WiFi user Go to Authentication – User Management
Click the Add button to add a new user for WiFi access. To delete user select user and click the delete button.
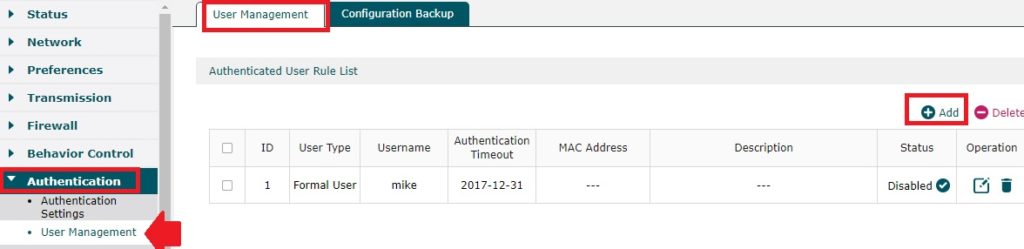
TP-link Authentication Support Two type of users.
1: Formal User
2: Free User
1: Formal User: The formal user is who are the permanent user of the location and need access the internet regularly. EXP – hotel staff, office staff)
You can set internet access for a long period like monthly, yearly based package for the formal user.
To adding a permanent wifi user use the Formal user type.
User Type: Formal user
Username: create the username for wifi access.
Password: create a password for wifi access.
Expiration Date: set the date of expiring user. After cross the expire date user cannot access the internet.
Authentication Periods: set the time period when need to again authenticate.
Mac binding: if you want to Mac bind you can use Static and Dynamic.
- Static Mac Binding can only access the internet from the device Mac address bond to the same user. In
- Dynamic Mac binding user mac address will bind on authentication.
- No Binding can use any device to log in this user for internet access.
Maximum User: set the user number can use multisession to access internet.
If set 1 then only one time can login using this user. You can set the session limit of use the user login limit. You can set the 1-1024 session for per user.
Upstream Bandwidth: set the upload speed limit for this user.
Downstream Bandwidth: set download speed limit for the user.
Name: you can fill other information for the user like name, address, telephone number, etc.
Status: Enable. ( disable status consider deactivated user)
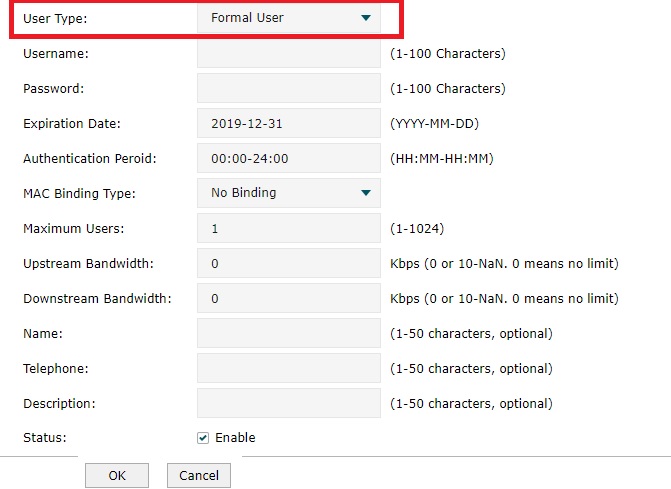
Click the Save button to apply settings.
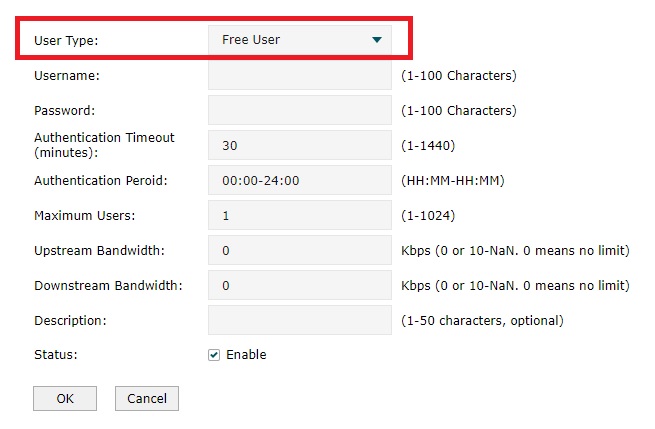
Adding Free User
Free user can use for guest access. You can add the free user to provide internet access to guest with the limit of fix time duration.
Create the username and password for the free user as follow above steps for the formal user.
You can only set the time in minute for free user.
Authentication timeout- set the time limit you want to provide a free user or to your guests.
Set the user login limit and the speed limit for free user and enjoy a secured WiFi network using captive authentication login.
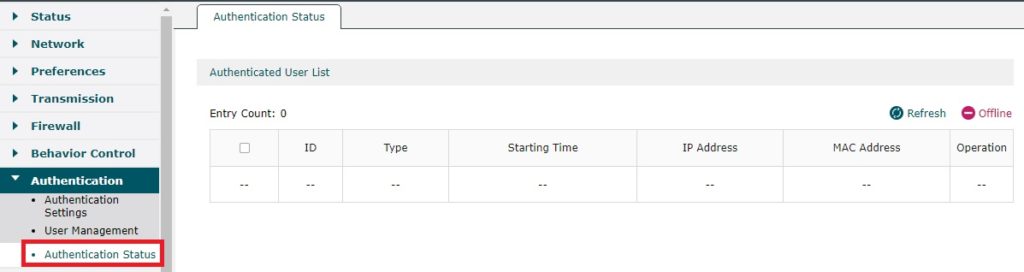
Check Status of Captive portal Online User
To check the total number of user active in load balance router follow the steps.
You can check IP Address, user ID, Mac ID and starting time status.
Go to Authentication- Authentication status
See the list of online user in WiFi hotspot captive portal.
Final Word
Hotspot Captive portal login page one of the most popular methods of authenticating WiFi user. Today every one having internet access with the tablet, smartphone so captive portal should be responsive and interactive. So does not matter WiFi user use captive portal login in Android, Windows or any other platform when you are using a secure authentication method.
Related Post
- TP-Link EAP225 Ceiling Mount AP Configuration Without Controller
- How to connect two Wi-Fi routers Without Cable wirelessly
- Protect Network and Wireless Devices from Lighting and Thundering
- How to set internet Speed limit in iBall AC1200 WiFi Router
The post How to Design Captive Portal Login Page on TP-Link Load Balance Router appeared first on .
from https://ift.tt/2FGeHEt
Comments
Post a Comment